The development of a garment comprises of different process. Fit is the most important factor leading to the final acceptance or rejection of a garment. Fit must be designed into the original pattern through subtleties in the pattern that provide fullness unobtrusively at appropriate locations to accommodate body bulges in a flattering manner (Hudson). Good customized fit is dependent on the pattern drafting incorporating various shapes and proportions of the individual customer. With the onset of the Industrial Revolution, standardized patterns were essential to the success of ready-to-wear clothing.
Pattern making is an art. It is the art of manipulating and shaping a flat piece of fabric to conform to one or more curves of the human figure . Pattern making is a bridge function between design and production. A sketch can be turned into a garment via a pattern which interprets the design in the form of the garment components.
A pattern is flat while the body is not. The body has height, width and depth. With in this roughly cylindrical framework there are a series of secondary curves and bulges, which are of concern to the pattern maker. Darts are the basis of all pattern making. They convert the flat piece of cloth into a three dimensional form, which fits the bulges of the body.
A patternmaker typically makes a pattern from a flat sketch with measurements or a two dimensional fashion illustration. The basic pattern is the very foundation upon which pattern making, fit and design are based. The basic pattern is the starting point for flat pattern designing. It is a simple pattern that fits the body with just enough ease for movement and comfort (Shoben and Ward).
Methods of Pattern Making
Pattern making involves three methods-
Drafting: It involves measurements derived from sizing systems or accurate measurements taken on a person, dress or body form. Measurements for chest, waist, hip and so on, and ease allowances are marked on paper and construction lines are drawn to complete the pattern. Drafting is used to create basic, foundation or design patterns.
Draping: It involves the draping of a two dimensional piece of fabric around a form, conforming to its shape, creating a three-dimensional fabric pattern. This muslin is transferred to paper to be used as a final pattern (Armstrong). Ease allowances for movement are added to make the garment comfortable to wear. Advantage of draping is that the designer can see the overall design effect of the finished garment on the body form before the garment piece is cut and sewn. However, it is more expensive and time consuming than flat pattern making.
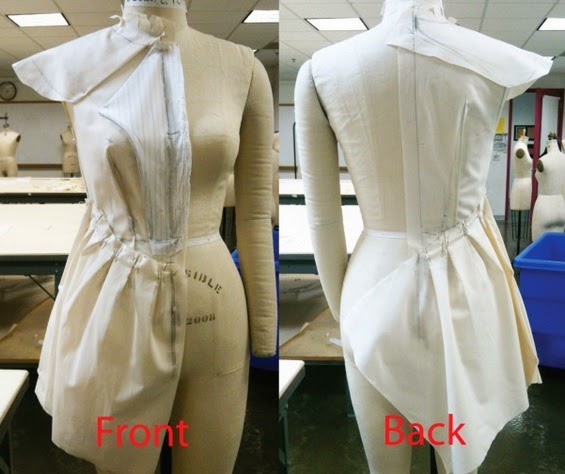
Flat Pattern Making: It involves the development of a fitted basic pattern with comfort ease to fit a person or body form. A sloper is the starting point for flat pattern designing. It is a simple pattern that fits the body with just enough ease for movement and comfort (Shoben and Ward). Five basic pattern pieces are used for womens clothing. They include a snug-fitting bodice front and bodice back with darts and a basic neckline, a sleeve and a fitted skirt front and back with darts. However, as fashion changes frequently womens styles fluctuate frequently. These basic slopers are then manipulated to create fashions.
A basic sloper has no seam allowances, which facilitates its manipulations to various styles. It has no design interest, only construction lines are marked on it. It is necessary that the basic structure of a sloper should be such that adjustments can be introduced easily. For a good pattern making, accurate measurements are of utmost importance.
The flat patternmaking method is widely used in the ready-to-wear market because it is fast and accurate.
Pattern making in today's world
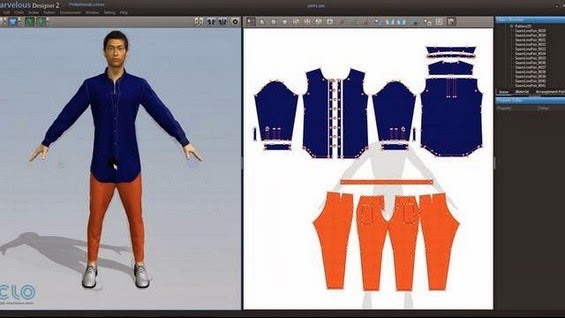
Pattern making today has become an easy job with the use of the computers. Now-a-days different softwares are available in the market to meet the needs of the manufacturers. The different softwares used are Gerber, Lectra, Tukatech , OptiTex etc. These softwares has made the job of the Pattern master easier. They have made the process of pattern making more economical and less time consuming.
Pattern-making softwares enables you to input your measurements and draft out a pattern. These softwares draft patterns to fit your measurements specifically, eliminating much fitting trial and error in the sewing room.
A pattern can be made from a 3D form in just a few steps by using these softwares. An individual's measurements are collected from 3D body scanner. The measurements are used to create a virtual 3D model of the individual's body. The 3D to 2D software allows the user to define a garment surface in relation to the 3D body model. Once the garment surface is defined, the application automatically unwraps and outputs a 2D flat pattern in .dxf format.
MEASUREMENTS
Tools use for Drafting
Tape Measure :- This is likely something you already have in your stash, because if you have been making clothing you should have been measuring your body along the way! If not, pick up a good quality fiberglass tape measure today so you can start your pattern making off right with correct body measurements.
Seam Ripper :- Like the tape measure, you probably have a seam ripper. You will use this in patternmaking for taking out your basting stitches when you move from the muslin fitting to the pattern drafting stage.
Fine Point Sharpie Marker :-Muslin versions are always ugly because they are marked up, but you want to make your markings with a permanent and fine point. I like these push-button fine point sharpie pens as the cap always seems to get lost in my studio! These are quick and easy to use.
Tracing Wheel :-To take your markings from the muslin stage to the patternmaking stage, this tool will pierce through the paper and leave behind marks to draft with a mechanical pencil.
Rotary Cutter :-I like using my rotary cutter for the big broad strokes of cutting muslin. Make sure to use a cutting mat beneath your item to protect the cutting surface of the table underneath!
Fabric Scissors :-Sharp, high-quality scissors are used for all your fabric cutting in sewing and patternmaking. These will shape the muslin down to the proper size after you have cut it big and broad with the rotary cutter.
Tracing Paper :-I personally do not use this, but many designers like it for leaving marks behind on their muslins. I like a sharpie or tracing wheel, but try these sheets out and perhaps you will love them! Many people do.
Scotch Tape :-It is inevitable that you will need to tape pattern pieces together and I find that basic Scotch tape is the best for this.
Clear Rulers :-Having a variety of clear rulers in different shapes and sizes is essential in your kit for patternmaking. I like having a little one for marking in tiny areas, long ones for making marks for pin tucks, side seam lines, and other parts of the patternmaking process that call for something longer than average. I also have a quilting square with diagonal lines for helping square up corners and creating angles.
Right Angle :-This is also a huge help in creating perfect 90 degree angles on your pattern. These are also available in clear plastic, which most people prefer. I have had this black one since art school and still use it.
Curved Rulers :-To shape arm holes, hip curves, hems and other lines that are not straight in patternmaking, it is essential that you have a few different curved rulers to get the proper slope in your pattern
Standard pattern symbols
Sewing patterns typically include standard symbols and marks that guide the cutter and/or sewer in cutting and assembling the pieces of the pattern. Patterns may use:
Pattern making is an art. It is the art of manipulating and shaping a flat piece of fabric to conform to one or more curves of the human figure . Pattern making is a bridge function between design and production. A sketch can be turned into a garment via a pattern which interprets the design in the form of the garment components.
A pattern is flat while the body is not. The body has height, width and depth. With in this roughly cylindrical framework there are a series of secondary curves and bulges, which are of concern to the pattern maker. Darts are the basis of all pattern making. They convert the flat piece of cloth into a three dimensional form, which fits the bulges of the body.
A patternmaker typically makes a pattern from a flat sketch with measurements or a two dimensional fashion illustration. The basic pattern is the very foundation upon which pattern making, fit and design are based. The basic pattern is the starting point for flat pattern designing. It is a simple pattern that fits the body with just enough ease for movement and comfort (Shoben and Ward).
Methods of Pattern Making
Pattern making involves three methods-
- Drafting
- Draping
- Flat paper patternmaking
Drafting: It involves measurements derived from sizing systems or accurate measurements taken on a person, dress or body form. Measurements for chest, waist, hip and so on, and ease allowances are marked on paper and construction lines are drawn to complete the pattern. Drafting is used to create basic, foundation or design patterns.
Draping: It involves the draping of a two dimensional piece of fabric around a form, conforming to its shape, creating a three-dimensional fabric pattern. This muslin is transferred to paper to be used as a final pattern (Armstrong). Ease allowances for movement are added to make the garment comfortable to wear. Advantage of draping is that the designer can see the overall design effect of the finished garment on the body form before the garment piece is cut and sewn. However, it is more expensive and time consuming than flat pattern making.
A basic sloper has no seam allowances, which facilitates its manipulations to various styles. It has no design interest, only construction lines are marked on it. It is necessary that the basic structure of a sloper should be such that adjustments can be introduced easily. For a good pattern making, accurate measurements are of utmost importance.
The flat patternmaking method is widely used in the ready-to-wear market because it is fast and accurate.
Pattern making in today's world
Pattern making today has become an easy job with the use of the computers. Now-a-days different softwares are available in the market to meet the needs of the manufacturers. The different softwares used are Gerber, Lectra, Tukatech , OptiTex etc. These softwares has made the job of the Pattern master easier. They have made the process of pattern making more economical and less time consuming.
Pattern-making softwares enables you to input your measurements and draft out a pattern. These softwares draft patterns to fit your measurements specifically, eliminating much fitting trial and error in the sewing room.
A pattern can be made from a 3D form in just a few steps by using these softwares. An individual's measurements are collected from 3D body scanner. The measurements are used to create a virtual 3D model of the individual's body. The 3D to 2D software allows the user to define a garment surface in relation to the 3D body model. Once the garment surface is defined, the application automatically unwraps and outputs a 2D flat pattern in .dxf format.
MEASUREMENTS
- Bust – measure just under the arms around the fullest part of chest.
- Waist – measure around narrowest part of torso.
- High Hip – measure 6 inches [15.5 cm] below waist around the hips.
- Back-waist length – measure from nape of neck to waist level
- Shoulder length – measure shoulder from ball socket to side of neck.
- Armhole depth – measure from nape of neck to under arm level.
- Back width – measure from armhole to armhole across shoulder blades.
- Neck – measure around base of neck.
Tools use for Drafting
Tape Measure :- This is likely something you already have in your stash, because if you have been making clothing you should have been measuring your body along the way! If not, pick up a good quality fiberglass tape measure today so you can start your pattern making off right with correct body measurements.
Seam Ripper :- Like the tape measure, you probably have a seam ripper. You will use this in patternmaking for taking out your basting stitches when you move from the muslin fitting to the pattern drafting stage.
Fine Point Sharpie Marker :-Muslin versions are always ugly because they are marked up, but you want to make your markings with a permanent and fine point. I like these push-button fine point sharpie pens as the cap always seems to get lost in my studio! These are quick and easy to use.
Tracing Wheel :-To take your markings from the muslin stage to the patternmaking stage, this tool will pierce through the paper and leave behind marks to draft with a mechanical pencil.
Rotary Cutter :-I like using my rotary cutter for the big broad strokes of cutting muslin. Make sure to use a cutting mat beneath your item to protect the cutting surface of the table underneath!
Fabric Scissors :-Sharp, high-quality scissors are used for all your fabric cutting in sewing and patternmaking. These will shape the muslin down to the proper size after you have cut it big and broad with the rotary cutter.
Tracing Paper :-I personally do not use this, but many designers like it for leaving marks behind on their muslins. I like a sharpie or tracing wheel, but try these sheets out and perhaps you will love them! Many people do.
Scotch Tape :-It is inevitable that you will need to tape pattern pieces together and I find that basic Scotch tape is the best for this.
Clear Rulers :-Having a variety of clear rulers in different shapes and sizes is essential in your kit for patternmaking. I like having a little one for marking in tiny areas, long ones for making marks for pin tucks, side seam lines, and other parts of the patternmaking process that call for something longer than average. I also have a quilting square with diagonal lines for helping square up corners and creating angles.
Right Angle :-This is also a huge help in creating perfect 90 degree angles on your pattern. These are also available in clear plastic, which most people prefer. I have had this black one since art school and still use it.
Curved Rulers :-To shape arm holes, hip curves, hems and other lines that are not straight in patternmaking, it is essential that you have a few different curved rulers to get the proper slope in your pattern
Standard pattern symbols
Sewing patterns typically include standard symbols and marks that guide the cutter and/or sewer in cutting and assembling the pieces of the pattern. Patterns may use:
- Notches, to indicate:
- Seam allowances. (not all patterns include allowances)
- Centerlines and other lines important to the fit like the waistline, hip, breast, shoulder tip, etc.
- Zipper placement
- Fold point for folded hems and facings
- Matched points, especially for long or curving seams or seams with ease. For example, the Armscye will usually be notched at the point where ease should begin to be added to the sleeve cap. There is usually no ease through the underarm.
- Circular holes, perhaps made by an awl or circular punch, to indicate:
- A dart apex
- Corners, as they are stitched, i.e. without seam allowances
- Pocket placement, or the placement of other details like trimming
- Buttonholes and buttons
- A long arrow, drawn on top of the pattern, to indicate:
- Grainline, or how the pattern should be aligned with the fabric. The arrow is meant to be aligned parallel to the straight grain of the fabric. A long arrow with arrowheads at both ends indicates that either of two orientations is possible. An arrow with one head probably indicates that the fabric has a direction to it which needs to be considered, such as a pattern which should face up when the wearer is standing.
- Double lines indicating where the pattern may be lengthened or shortened for a different fit
- Dot, triangle, or square symbols, to provide "match points" for adjoining pattern pieces, similar to putting puzzle pieces together


 Posts
Posts

